We have already discussed installing WordPress single website. And it is very common also. The twisting facto is, with a single WordPress now you set upset up multiple networks, Yes you heard rightWordPresspress and multisite site. WordPress is an awesome platform which has the capability to create multiple websites with its single installation. Isn’t is cool and awesome. I am very excited to write about it and hope you will love to read it and will be helpful for you. Before moving forward let us have a brief discussion about WordPress and its features:
What is WordPress?
WordPress is a free content management system used to build and maintain websites. It is easy to use and have very advanced features makes is popular among all. It provides a web-based user interface for designing, publishing, and updating websites.
WordPress is the Framework behind many of the websites and blog you every day
Features
- Responsive design
- Social sharing features
- Multiple page styles
- Auto upgrade and support
- Plenty of widgets
- Awesome theme customization
- SEO friendly
- Retina-Display Ready
- Standards Compliant Coding
Table of content
- WordPress Multiple website description
- Advantage and drawbacks of WordPress multiple websites
- User for WordPress multiple Website
- Requirements
- Things before Installation of WordPress multiple websites
- Allow multisite in wp-config.php
- Domain for your multisite network
- Wildcard subdomain
- Enabling the features
- WordPress multisite network setting and its configuration
- Registration for network
- Adding a new website
- Uploading setting for multisite
- Themes and plugins addition
- Troubleshooting of the network
Now let us describe all the contents one by one so that you can get detail information about the topic. Let’s get started:
WordPress Multiple website description
You might be cleared about the topic from its name. WordPress website is an advanced feature of WordPress which allow you to run multiple sites in the single installation of WordPress and runs it very well.
The best part of multiple WordPress sites is you can create multiple new websites with your single username and password which can be managed very smoothly. Not only that but with a single domain name other users can also create and signup their blogs. Thus we can say that WordPress multiple websites is very advanced as well as a very useful network.
Advantage and Drawbacks of WordPress multiple websites
Advantage
- You are able to manage multiple websites from a single dashboard
- Single admin for each site who can uniquely manage their respective site.
- Single theme and plugin can be used for all websites
- Updates are easily managed. You can do it once for all multiple websites.
Drawbacks
- With the down of any one website, none of them can perform well as they all are using the same resource.
- Website traffic will be unmanageable or affect to another site at the beginning level.
- If hacker hacked any one website, all sites will be hacked automatically.
- You have to use the same plugins for all website but some of the plugins are not suitable cannot perform well for all sites.
- Limitation on the hosting.
User for WordPress multiple Website
There are some other tools for managing multiple websites in a single platform like ManageWP, InfiniteWP, and others. But some of the specified users of WordPress multiple sites are listed below:
- Your blog website working with same domain
- Websites of the magazine which is created with a different section by different teams
- Different departmental websites of government and non-profit organization
- School and college website for several students for their blog
- Business websites having various subsites of different location
Requirements
As you know that multiple WordPress websites need single hosting so it should be powerful and perfect. If you have created a few websites then you can use shared hosting. But in the case of multiple websites, VPS hosting plans will perform well.
Suppose we have only a few websites now but later want to increase it in multiple numbers then I suggest you choose SiteGround which will be perfect for both types of website. Simply you can say that SiteGround is a combined feature of shared and VPS hosting. Besides these all, there are also some other hosting like Bluehost and WP Engine.
Things before Installation of WordPress on multiple websites
Before starting your installation process you make to keep certain things in mind such as:
- You have already done with your WordPress installation.
- Your URL’s should be like http://example.com/ page
- Deactivate all the plugins.
- Backup your WordPress Installation
- Make sure you have FTP access for your WordPress installation.
We recommend you to the backup website because you can restore it in case you faced the problem while setup the network.
Allow multisite in wp-config.php
After completing the installation process you have activated its multiple sites. The multisite features should be activated in the wp-config.php. For this go through the following steps:
- FTP connection should be done on your website
- Open wp-config.php located in the main directory of your WordPress. Add the following in it.
Define (‘WP_ALLOW_MULTISITE’, true);
above the line:
Define WP_ALLOW_MULTISITE in wp-config.php to enable the multiple features
- Save the file wp-config.php
Domain for your multisite network
Your new sites can be added on your multisite WordPress network with two options of the domain. One is subdomains and another is sub-directories. Your subdomain is like http://site1.example.com and the subdirectories be like http://example.com/site1/.
For your subdomain, you must configure wildcard subdomain on the server and for subdirectories, you have to enable pretty permalinks on your root site.
Wildcard subdomain
As discussed above, you have an option for choosing subdomain or subdirectories. This step is for the condition while you are choosing subdomain. If your selection is subdomain then you must have to choose wildcard subdomain. For this you have to follow the following process:
- Login to your WordPress hosting panel dashboard
- Click on the subdomain in the domain section
- Sign in the subdomain field and select the main domain from the drop-down menu
- Once the document root is displayed, click on create a button
Enabling the features
Every WordPress installation comes up with built-in multisite features. You just have to activate it. Before enabling the multisite features to make sure you have backup up your WordPress site. After this, you can go through the following process for enabling these features.
- Connect to your site using FTP client or panel
- Open up-config.php and add the following code
define(‘WP_ALLOW_MULTISITE’, True);
- Save up-config.php and upload it to the server
In this, your multisite features will be enabled and then you can set up your multisite network.
WordPress multisite network setting and its configuration
Up to now, you have enabled your WordPress multisite features. And your next step is its set setup for which you have to follow the following process:
- Go to installed plugins
- Select the deactivate button
- Click on apply
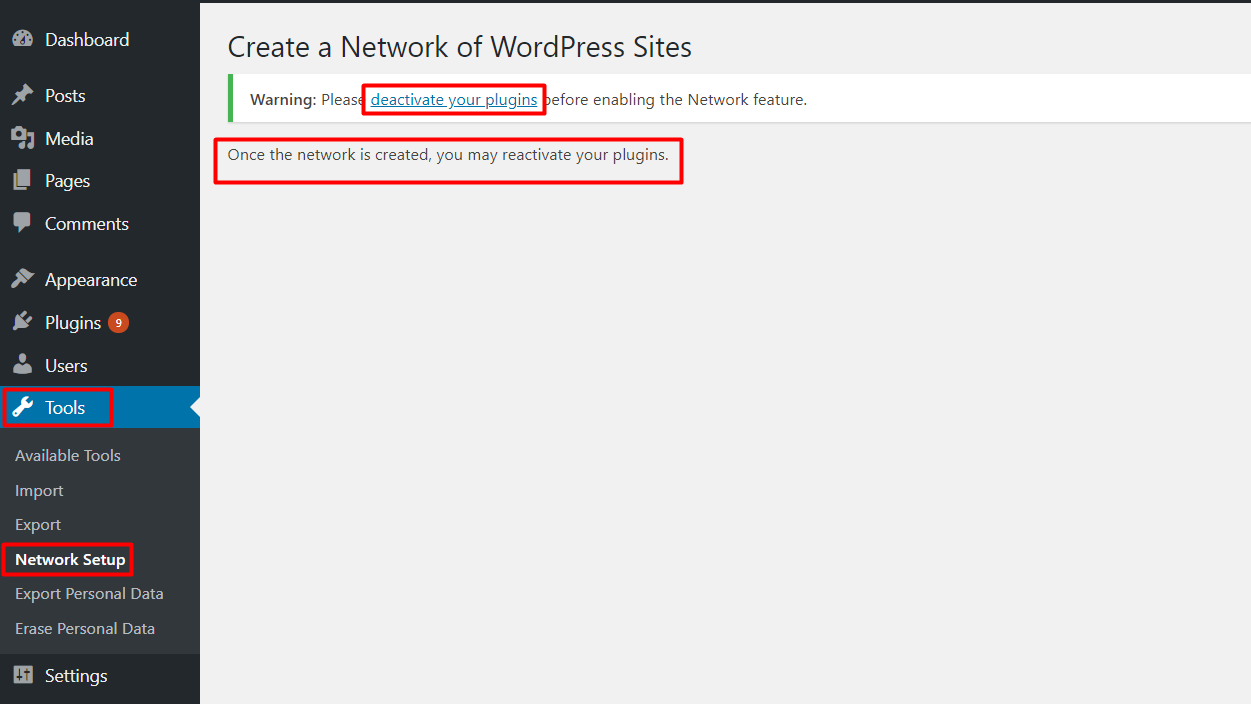
In this way, your previously installed plugins will be deactivated and then you have to proceed for network setup. For this go to tools and then network setup where you will receive a notice for Apache’s mod_rewrite module installation. Similarly, you have to denote the domain structure to your WordPress site. The next thing you have to do is, your network title and a correct email to the network admin.
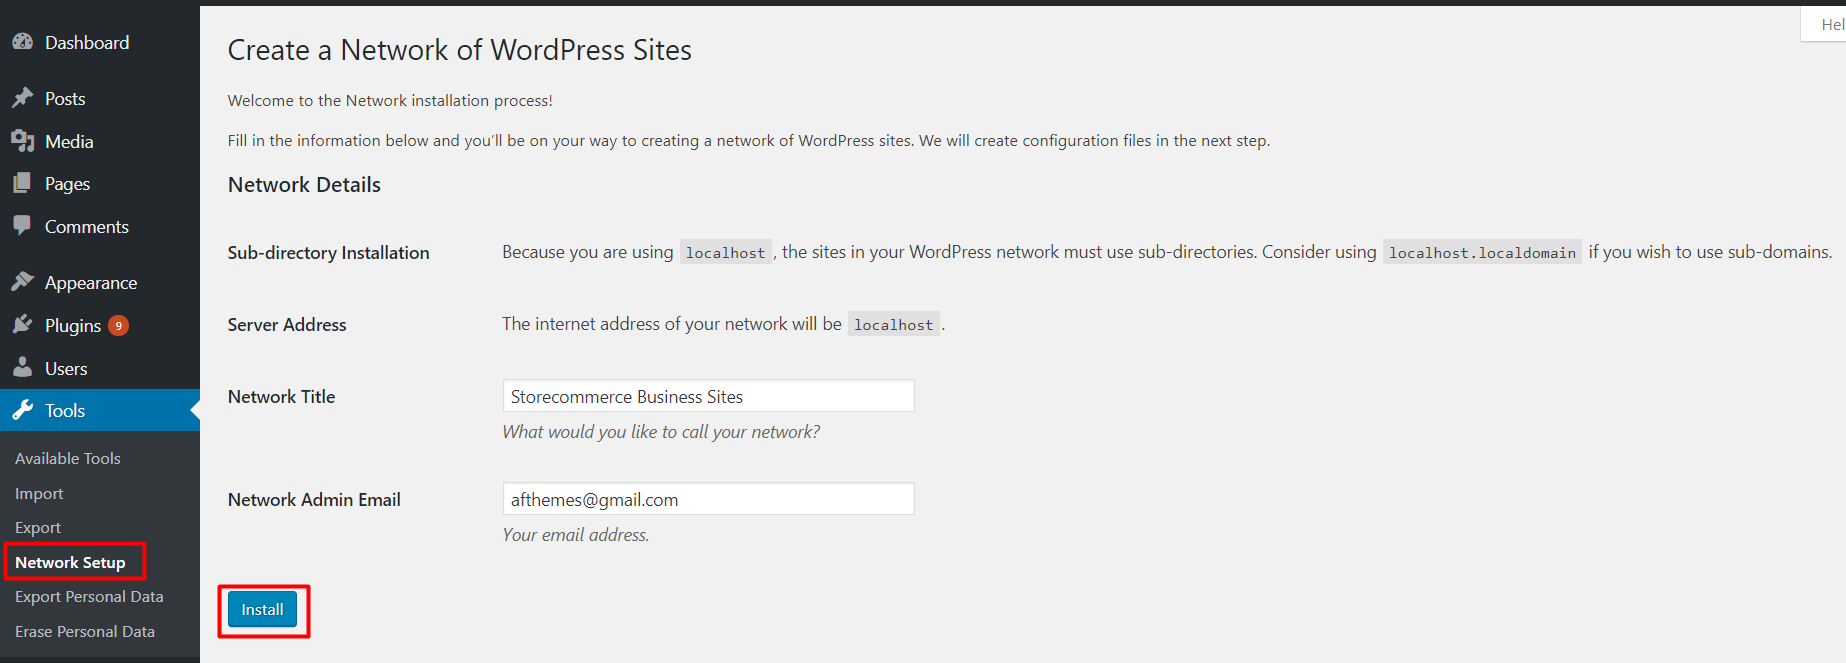
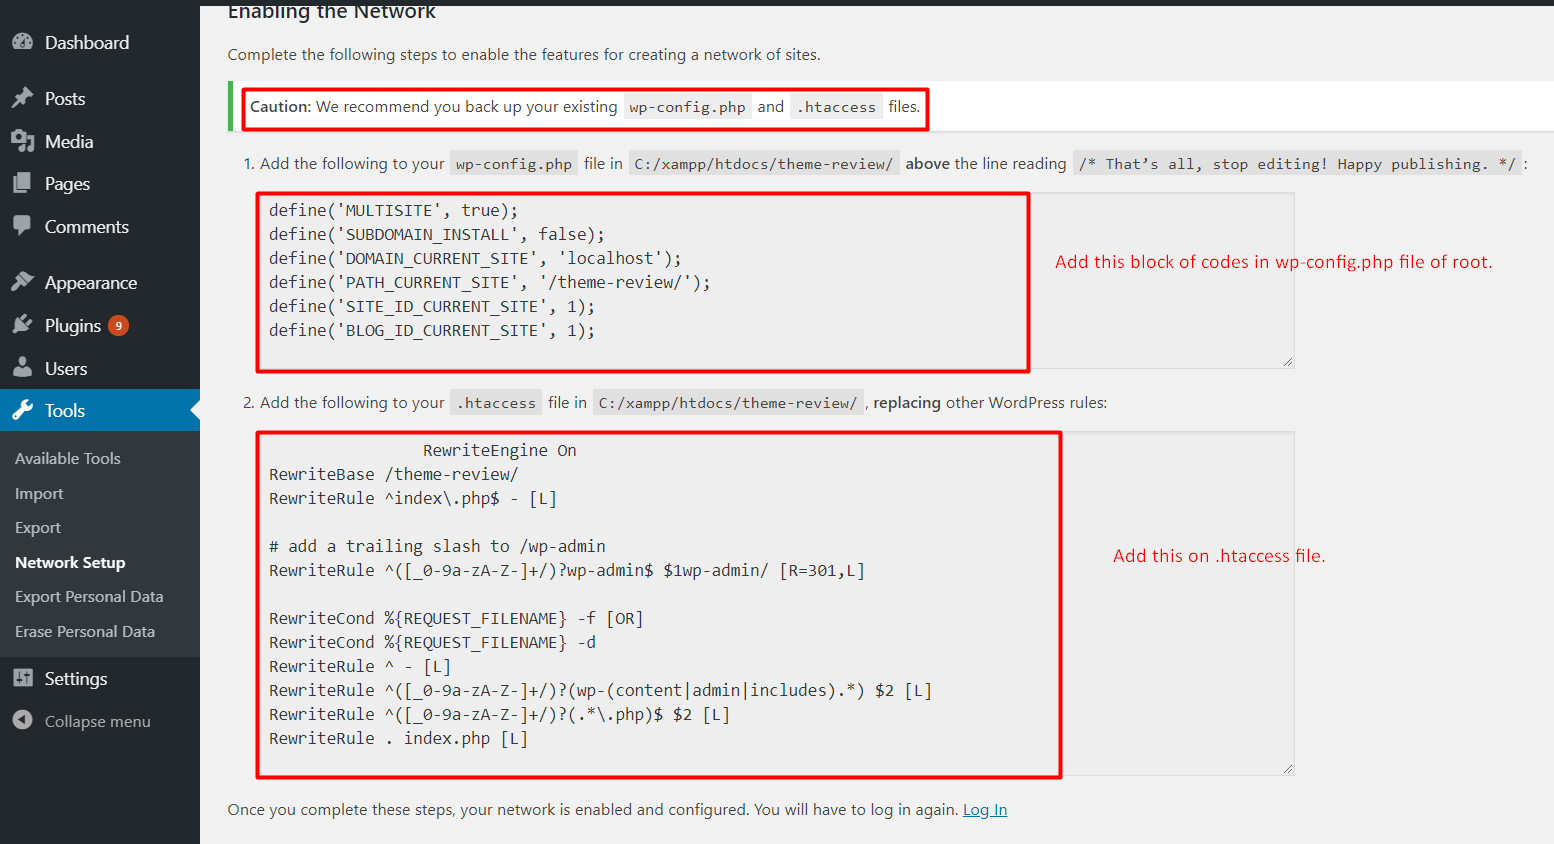
Continue the process and click on install button. Here you will receive some code. Add those code to your wp-config.php and .htaccess file. Finally login your WordPress site again, you will get access to your multisite.
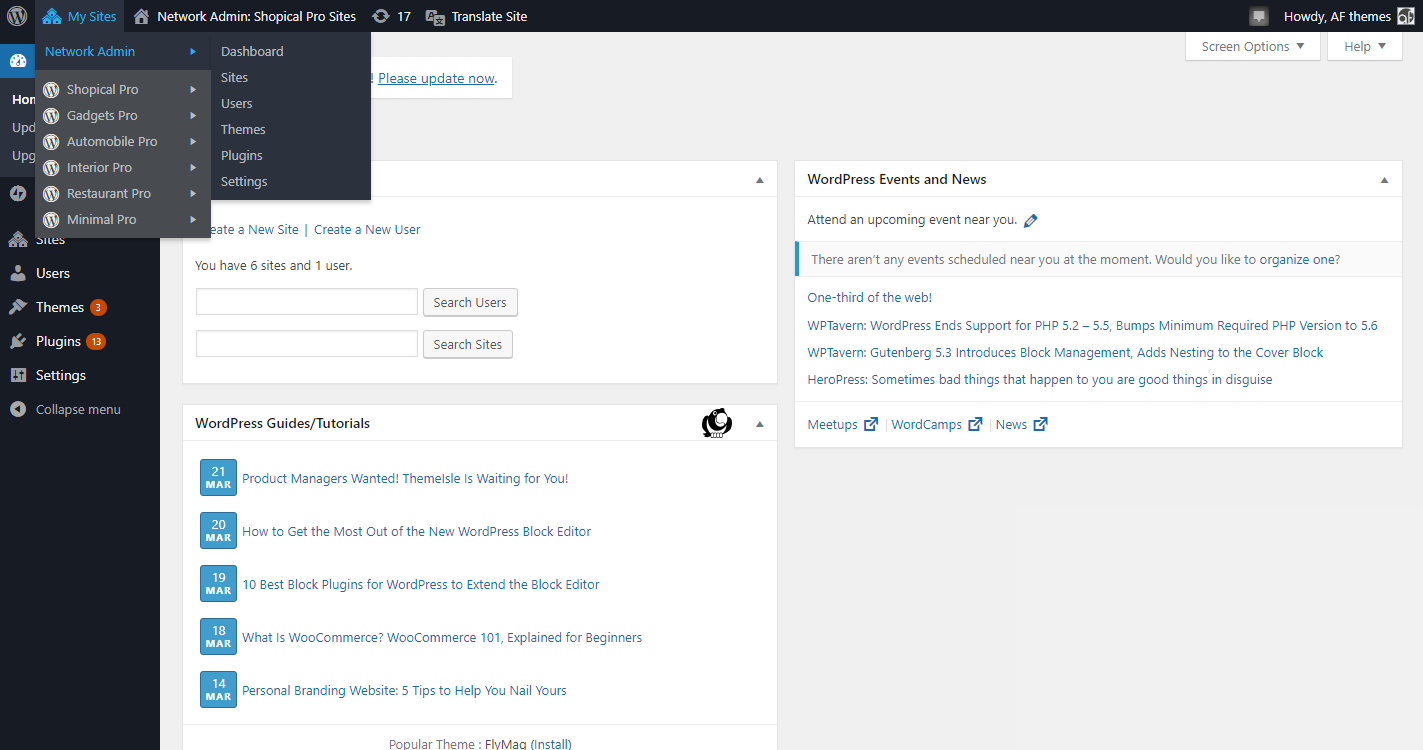
Now you can proceed for the configuration process. It is done from the network dashboard. Go through the following steps:
- Go to my sites
- Click on the network admin
- Go to dashboard
- The select setting in the admin sidebar
- Set your site title and email address
Registration for network
This section most important part of your network setting. In starting user and site registration are disabled by default. You have to open your site for user and site registration. For the confirmation notification of registration, you can check the registration notification box.
In case of single user administration site, check the box next to “Add New User”. If you want to limit the registration within your office then you can simply limit the email registration
Adding a new website

If you are activating multisite then you must have to add a multi-website to your WordPress. Multisite WordPress with a single website is useless. It does not sound good. So you must have to multiple sites. For adding you can go through the following process:
- Go to my site
- Enter the website address
- Enter the title for the website
- Choose the language
- Choose the unique email address
- Click the button “ALL SITE”. Now your new site will be added to your network.
Uploading setting for multisite
It is very important to be updated on your website resources. For the security and decrease overload, you can limit the uploading space and amount. The default value is 100 MB which is probably enough for 100 phots. You can increase or decrease it as per your requirement.
While coming towards its uploading materials than by default uploading options are images, audios, videos, and pdf. But don’t worry it is not limited in this. You can add other also which you need.
Themes and plugins installation
Theme Installation
- Go to my site
- Go to network admin
- Choose the theme option
- List of the theme will occur, you can choose any one and enable it
- After that Click on add a new theme on the top of the screen
- Go through previously installation process
- With “Network Enable “option make the theme available for all sites.
Plugin Installation
- Go to my site
- Go to network admin
- Choose the plugin option
- Click on “Network Activate”
Troubleshooting of the network
Multisite setup goes through several steps. You might make mistakes at several places but most probably it is done with subdomains part. To fix it you can apply the following codes:
define (‘SUBDOMAIN_INSTALL’, False);
For another issue, you can go through another process.
Conclusion
Hence this is all about the setup and installation process for WordPress multiple sites. You can easily follow up the above procedure and built up the powerful websites. This is an advanced technique. So need to perform it with patience.
In case you are getting any trouble you can leave your comment in our comment section. We will get back with your answer as soon as possible. You can also forward us your review regarding this article. Keep visiting our website for more such awesome and new articles.


Nice post mate, keep up the great work, just shared this with my friend
Great article! Your step-by-step guide to installing and setting up WordPress Multisite is incredibly clear and easy to follow. I especially appreciate the helpful screenshots and the tips for potential pitfalls. This is exactly what I needed to confidently create a WordPress Multisite network. Thank you for sharing your expertise!
This is exactly what I needed to confidently create a WordPress Multisite network. Thank you for sharing your expertise
Thank you for detailed information. It help me a lot.